Batch Processing
Batch processing allows you to automate work processes. You can specify certain edits for an audio file, which are then applied to all files in a list (the batch) of any size. The definition of the edits, including format conversions and save naming scheme, is called a job. You can also define several such batch jobs, which can be collected in a job list and executed independently one after the other.
Possible editing options are:
Settings can be made for the location and naming of the created files as well as how the original is to be kept.
In the Error Handling tab, you can also specify how to handle files with errors.
For example, you can normalize a whole folder full of 24-bit wave files, apply 5 ms fades at the beginning and the end of each file, compress them with the multi-band compressor, change them all to 16-bit mono and then save them all as MP3 files.
The process for batch conversion is as follows:
-
In the Source files tab, select the files for editing.
-
In the Effects tab, select the required editing processes.
-
In the Target format tab, select the output format.
-
In the Target files tab, specify where and under what names the files should be saved.
-
On the Error Handling tab you can configure how to handle corrupted files.
You can run multiple batch jobs in succession. The job list located on the right edge of the batch window is used for this.
With Save you can save a job. This allows you to reuse jobs once configured in subsequent sessions by loading them back into the job list with Load.
New jobs are created by clicking the Add job button. When you click a job, the settings of this job (source files, effects, destination format, destination files) are displayed in the dialog. Run Jobs starts batch processing and runs all loaded jobs. Delete job removes the selected job.
All jobs remain loaded in the list until you quit Sequoia, even if you close the batch window in the meantime.
Create the list of files you want to edit.
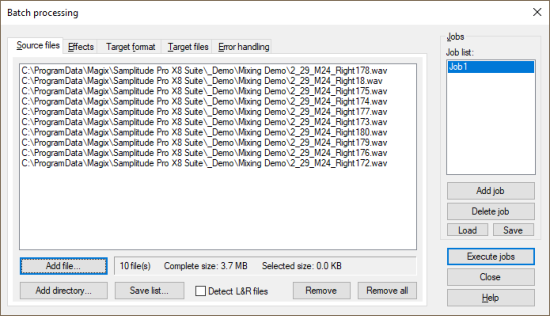
Click Add File to open a file browser to select the files you want to include in the list. Multiple selection of files is also possible here. Select Add directory to add all of the audio files in a folder (including all subfolders). You can add files in all file formats that Sequoia can import. With Save list you can save a list of your file selection in *.m3u format. The option Detect L&R files makes it possible to edit left and right files as stereo.
Remove deletes all selected list entries. Remove all deletes the complete list.
Here you specify the effect processing for the files:
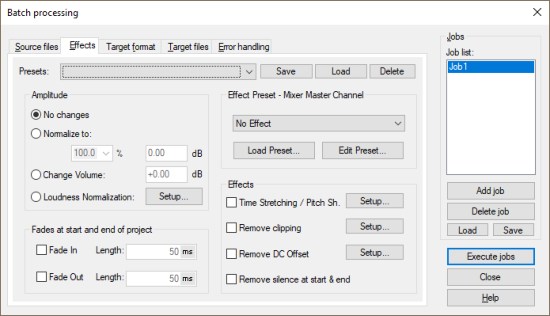
Normalize to: You can specify a target maximum amplitude value in % or in dB. For example, a value of 75% corresponds to -2.5dB. You can also enter volume changes in dB.
For detailed information on normalizing, see the section Normalizing.
Loudness Normalization: Here you have the possibility to apply a loudness adjustment to bring the selected files to a certain loudness value. For details, please refer to Loudness Adjustment.
Fades at start and end of project: Linear fades can be added to the start and end of files.
Effect Presets - Mixer Master Channel: In this section you can use any combination of all real-time effects from Sequoia in batch processing. The presets used for this purpose correspond to the mixer snapshots. Saved mixer snapshots can be selected from the menu or loaded into batch processing as *.mix file with preset.
To create mixer snapshots for batch processing:
-
Load one of the files you want to edit into a new project.
-
Load the effects you want to use into the mixer's master channel (at Master Plug-ins) and make the necessary settings.
-
Save the mixer settings to a mixer preset. To do this, click the Save Mixer to File button  below the mixer snapshot locations.
-
Load the saved mixer snapshot in the Effects tab of the batch dialog from the menu.
You can also use Edit Preset to open the Effect Browser with associated FX Routing dialog directly from the batch processing to edit the effect chain for batch processing. However, the "detour" via the mixer makes it possible to try out the effects on the audio material before using them.
Additional effects: Beside the Mixer effects the non-real-time effects Timestretching/Pitchshift, Remove clipping and Remove DC offset can be used. The Setup buttons open the corresponding effects dialogs.
Remove silence at start and end removes silence at the beginning and end of the file.
Here you specify a destination format for the files. This allows you to convert files to other file formats.
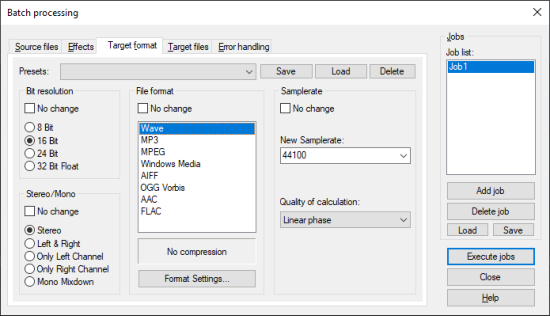
You can choose the bit resolution (8/16/24/32 bit float), the sample rate, stereo/mono/left/right as well as the save format with the corresponding format settings.
All settings of this tab can be saved as preset for later use.
Here you define where and under which name the processed files are saved and what should happen to the source files.
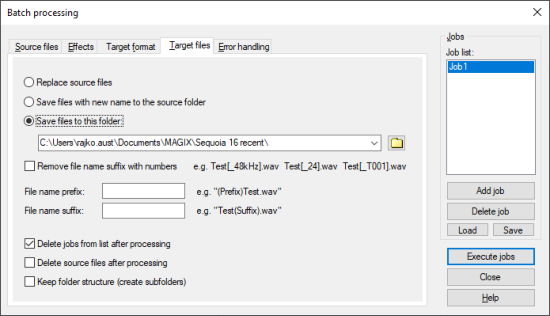
Replace source files: The original file is replaced with the edited one. If the file is used in a virtual project, the VIP is closed first.
Save files to the source folder with changed names: The edited file will be saved in the source folder next to the source file - adding the additional characters to the file name that you can enter in the fields File name prefix and File name suffix.
Save file to this folder: The edited file will be saved in the folder specified here. If you have entered characters in the file name prefix and file name suffix fields, the file names will also be expanded accordingly.
Remove file name suffix with numbers: This option removes numbers added by the Sequoia batch processing function (e.g. "_48kHz" or "_T001").
Delete jobs from list after processing: If you select this option, a job that has been processed will be removed from the list.
Delete source files after processing: This option deletes the source files after the job is executed. A confirmation prompt will appear.
Keep source folder structure: This option saves all files in the same subfolder structure including the source path. This process creates subfolders as required.
Error handling detects files that deviate from the loudness norm with respect to certain criteria and should therefore be handled separately. These files are stored in a special error folder.
To enable error handling, select the Activate error folders option and select a folder where files will be stored. All other files are processed normally and saved in the defined target folder.
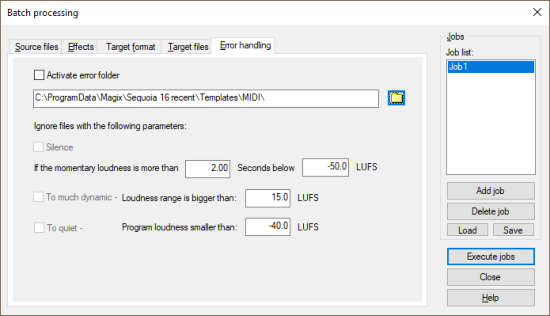
Silence: Sort out files that are below the specified momentary loudness (LUFS) for longer than the specified duration.
Too much dynamic: Sort out all of the files that exceed a certain loudness range (LUFS).
Too quiet: Sort out all of the files that fall below a certain loudness (LUFS).
By calling Sequoia.exe with the command line parameter -batch <job>.xml the batch processing can be executed from the command line. For example, you can use it to perform regular tasks such as converting and archiving completely automated by using batch scripts.
C:\Sequoia\Sequoia.exe -batch “C:\Batchfolder\job.xml“ | Out-Null
The normal Windows command line interpreter, when executing a .bat script, does not wait for a command to complete before executing the next command. If you want to invoke batch processing from batch files and use the results of batch processing later in the script, you must run such scripts in Windows Powershell.